Subversion Primer

This is a guide for a single user to setup a barebones SVN repository quickly and without any extra confusing instructions.

The following steps will show how to 1.setup a repository for a project, 2. import files into the repo, 3. pull them out into a different folder, and 4. submit changes back to the repo. Before starting, make sure you have subversion installed (sudo apt-get install subversion) on all the computers you will be using. For this howto I’ll be using the server “closetbox” and the client “icebox”. Both are running Ubuntu Linux.

  1. Create an SVN repository for a project on the server.

nick@closetbox:# sudo mkdir /var/svn
nick@closetbox:# sudo svnadmin create /var/svn/frozenindustries
nick@closetbox:# sudo chmod 770 /var/svn/frozenindustries
nick@closetbox:# sudo chown nick:nick /var/svn/frozenindustries

  1. Import files into the repository. I’m going to send over a wordpress blog which is sitting in a folder called “htdocs” on my desktop. This is only done once, after this files are updated using “ci”.

nick@icebox:# svn import -m “look, i’m importing” htdocs/ svn+ssh://closetbox/var/svn/frozenindustries/trunk

  1. Get your data back out of SVN an put it in a folder on the client where you’ll work on it.

nick@icebox:# svn co svn+ssh://closetbox/var/svn/frozenindustries/trunk fi/

  1. After making changes to files in fi, send the changes back to the server. SVN knows which server you checked out from by saving data in a .svn folder. It’ll pop open your default text editor to show the changes. Since we’re trying to be as simple as possible, just assume everything is correct, quit the text editor, and say “c)ontinue”

nick@icebox:# svn ci fi/

That’s it. Repeat steps 3 and 4 to grab copies of you project and submit changes.
Add a Drive to an LVM Volume

This guide shows how to add a drive to an existing LVM volume.

  1. Erase the partition table on drive /dev/hdd and create the Physical volume

# dd if=/dev/zero of=/dev/hdd bs=1024k count=1
# pvcreate /dev/hdd

  1. Look at the current volume group, for fun

# sudo vgdisplay -A

— Volume group —
VG Name disks
System ID
Format lvm2
Metadata Areas 7
Metadata Sequence No 2
VG Access read/write
VG Status resizable
MAX LV 0
Cur LV 1
Open LV 1
Max PV 0
Cur PV 7
Act PV 7
VG Size 859.70 GB
PE Size 4.00 MB
Total PE 220084
Alloc PE / Size 220084 / 859.70 GB
Free PE / Size 0 / 0

VG UUID N4TcI6-DIRS-3edy-FAa0-tdUL-MTSX-bs2lJE

  1. Add the Physical Volume to the existing Volume Group, which I creatively named “disks”

# sudo vgextend disks /dev/hdd

  1. Look at the current Volume Group again, my how it has grown

# sudo vgdisplay -A

— Volume group —
-snip-
VG Size 1.11 TB
PE Size 4.00 MB
Total PE 291625
Alloc PE / Size 220084 / 859.70 GB
Free PE / Size 71541 / 279.46 GB

  1. Extend the Logical Volume, this time named “backup”, use the free extents reported by vgdisplay

# sudo lvextend -l+71541 /dev/disks/backup

Extending logical volume backup to 1.11 TB
Logical volume backup successfully resized

  1. And then look at vgdisplay again, whee

# sudo vgdisplay -A

— Volume group —
-snip-
VG Size 1.11 TB
PE Size 4.00 MB
Total PE 291625
Alloc PE / Size 291625 / 1.11 TB
Free PE / Size 0 / 0

  1. Now the final and most exciting step, expanding the filesystem. You’re using XFS right? And here’s a surprise, it should be mounted when you resize it. xfs_growfs will automatically resize the XFS filesystem to use all the available free space, and do it in less than a second.

# sudo xfs_growfs /backup

Control Multiple Terminals Simultaneously

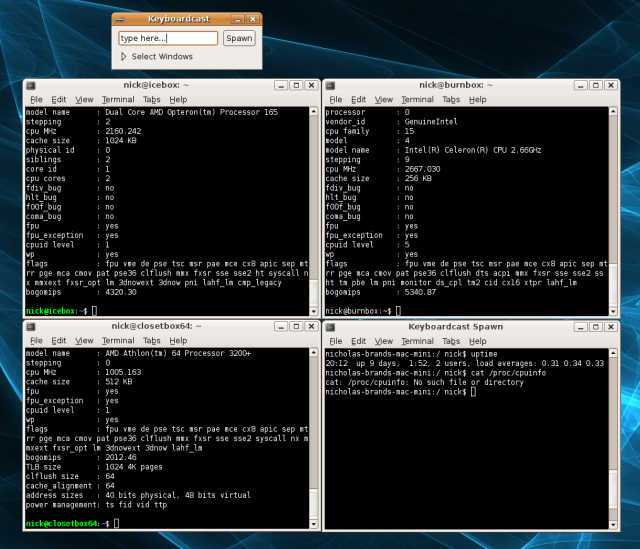
A small part of my job requires keeping eight Ubuntu desktops updated. While it’s easy to add the commands to update them to cron, I’d rather watch the updates occur in front of me in case something goes wrong. That’s where Keyboardcast comes in. Keyboardcast will take over or open as many Gnome Terminals as you’d like, and lets you enter text into all of them at once. It will also take over other windows, which may be useful for something, perhaps as keeping a log of all the commands you’ve entered in a text editor.

The benefit of using Keyboardcast is that it is quick to connect to multiple machines. It’s included in the Ubuntu Universe repository, and after a “sudo apt-get install keyboardcast”, anyone can control a group of computers easily. Here are the steps:

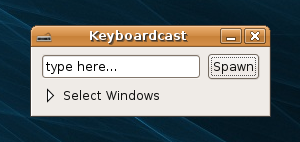
  1. Start Keyboardcast

keyboardcast.png

  1. Click Spawn and enter the command and arguments to use. Normally just changing the arguments to the correct hostnames is all that is needed to get started. More arguments, such as different users at different computers can be added. Although if you’re using SSH with different users, you’ll want to use passwordless logins to skip entering different password.

options.png

  1. After clicking OK terminals will open. Click where it says “type here…” in the small Keyboardcast window and start typing. Typing will show up in each terminal letter by letter.

terms.png
Having multiple terminals visible all the the same time makes watching for errors easy. If there is an error, it will on be the term which looks different. By setting up a new profile in Gnome Terminal called “keyboardcast”, you can change the window and font size of the terminals which are automatically opened by Keyboardcast.

Other Options for Controlling Multiple Terminals

Cluster SSH (cssh)

Cluster SSH came out before Keyboardcast and works in a very similar manner. There is a small window to enter text, and it uses multiple xterms by default instead of Gnome Terminals. Multiple computers can be scripted to open at the command line.

Konsole

Konsole is the default terminal for KDE and allows sending text to multiple tabs at once. Once open, hit View, then “send input to all sessions”. To see results, you’ll need to switch between tabs.

multi-gnome-terminal

MGT allows connecting multiple tabs together with tabs similarly to Konsole. Hit File, then “All bonded”.

Tentakel

Tentakel is unique from the other options because it has the ability to display data from multiple hosts all in the same terminal window. It makes a good solution if X is not available.

More:

pconsole 

My Life in Processors

Here’s my history of processors I’ve owned in my primary computer. This does not count second, third, or fourth computers, laptops, servers, media, or Seti/Distributed machines. Only computers which were used as my primary machine count.

  1. IBM 486SLC2 66 MHz
  2. Intel Pentium 166 MHz
  3. Intel Pentium 2 266 MHz
  4. Intel Celeron 300A 300 MHz @ 450 MHz
  5. AMD Athlon 500 MHz
  6. AMD Athlon 1000 MHz
  7. AMD Athlon XP 2100+ 1733 MHz
  8. AMD Athlon XP 2500+ 1833 MHz
  9. AMD Athlon 64 3200+ 2.0 GHz
  10. AMD Opteron 165 1.8 GHz @ 2.2 GHz
  11. Intel Core 2 Quad Q6600 2.4 GHz @ 3.0 GHz

WordPress Cache 2.0

WP-Cache 2.0 showed up on Digg today and with promises of speedy WordPress deliveries. Being the persistant software tester I am, I installed it onto this blog and immediatly saw the page load times at the bottom of the page get cut in half. I then installed it on LiveCDNews.com in hopes of speeding up that site in case of being Dugg again. Of course, having Apache configured to allow more than 150 people at a time on the site will help too.

Goodbye Microsoft

Peter Write, the author of a bunch of visual basic books, wrote in his blog about his reasons for completely ditching MS software and moving to OS X and Ruby on Rails.

Over and over I’d be lambasted for being too passionate (a condition muppets refer to as arrogance). Time and again I’d find myself explaining basics of programming to people that should know better, people with years of experience under their belts, people that really didn’t care.

There’s nothing more frustrating than having to waste time explaining basic concepts of your job to a coworker in the same position as yourself. It seems that this is acceptable in the IT, but I can’t imagine it passing in any other field. Working as tech support for 4 years at UCSB’s public computer repair facility introduced me to many techs who didn’t know how to open a computer, what a PCI card was, or that there was any way to fix a computer besides reinstalling Windows. The knowledgable techs were few and far between, and I’ve yet to work with one who had passion for MS software.

Installing Django on Ubuntu 6.06

Steps for install Django on Dapper Drake with Apache2, MySQL5, and Python2.4 already installed:

  1. sudo apt-get install libapache2-mod-python python-mysqldb python-docutils
  2. wget http://www.djangoproject.com/download/0.95/tarball/
  3. tar xfz Django-0.95.tar.gz
  4. cd Django-0.95
  5. sudo python ez_setup.py
  6. sudo python setup.py install
  7. start creating a Django app

Other notes:

  • python-setuptools included with Dapper is not recent enough for Django 0.95

My Firefox Extensions

Since I need to reinstall all my Firefox extensions due to a hard drive failure, I’ve decided to make a list:

  • del.icio.us firefox extension: A great addition to bookmarks. It hasn’t managed to replace them completely for me, but pretty much anything that would have landed deeper than one folder in my bookmarks menu now goes into del.icio.us.
  • Web Developer Extension: Building websites without this extension is like driving a car without tires.
  • Google Toolbar: First thing I do is hide everything except spellcheck and the form filling plugin. Those two functions make installing this worthwhile. I expect FF 2.0 to render the spellcheck redundant
  • Google Broswer Sync: Keeps the bookmarks which are not in del.icio.us up to date on my different computers. Also works great as a browser backup utility.
  • Forecastfox: because it’s nice to always know what the weather will be like tomorrow
  • Adblock: The ads that slow down my dual core system get blocked. Ads should never be allowed to use so much processing power that I can notice it.