Create a single, aligned partition on a drive larger than 2TB.
% sudo parted /dev/sdx (parted)% mklabel gpt (parted)% mkpart primary 1 -1 |
A Project Blog
Create a single, aligned partition on a drive larger than 2TB.
% sudo parted /dev/sdx (parted)% mklabel gpt (parted)% mkpart primary 1 -1 |
Just replaced my heavily used Ubuntu HTPC with a 6 watt AppleTV 2. Both run XBMC.
Specs of the old, silent HTPC:
Video is just as smooth on the AppleTV as on the HTPC.
Screens I look at on a normal weekday:
Tests are done across four 7200RPM SATAII drives on a PCI-X card sitting on a PCI (32-bit, 133MB/sec theoretical max) bus, probably the slowest bus configuration possible, and then again after being moved to a motherboard with dual PCI-X slots. Server is running Ubuntu 9.10 AMD64 Server.
Benchmark is a simple ‘dd’ sequential read and write.
write: dd if=/dev/zero of=/dev/md2 bs=1M
read: dd if=/dev/md2 of=/dev/null bs=1M
mdadm –create /dev/md2 –verbose –level=10 –layout=n2 –raid-devices=4 /dev/sd[ftlm]1
| PCI | PCI-X | |
| write: | 13.2 MB/s | 144 MB/s |
| read: | 4.0 MB/s | 89.3 MB/s |
mdadm –create /dev/md2 –verbose –level=10 –layout=f2 –raid-devices=4 /dev/sd[ftlm]1
| PCI | PCI-X | |
| write: | 48.3 MB/s | 131 MB/s |
| read: | 92.7 MB/s | 138 MB/s |
mdadm –create /dev/md2 –verbose –level=10 –layout=o2 –raid-devices=4 /dev/sd[ftlm]1
| PCI | PCI-X | |
| write: | 47.4 MB/s | 135 MB/s |
| read: | 98.7 MB/s | 142 MB/s |
And more comparisons:
RAID1 (PCI)
write: 38.9 MB/s
read: 64.8 MB/s
Single Disk (PCI)
write: 59.4 MB/s
read: 71.9 MB/s
Have an LVM device left on your system from a drive that was removed before pvremove was run?
1 | $ sudo dmsetup remove /dev/mapper/removed-device |
I wrote a short script that sends a Tweet whenver my Tivo HD starts recording a show. You can download it below. It runs best on a Linux computer that can constantly poll the Tivo.
Download: tivo_twitter.sh script
Results: http://twitter.com/30west
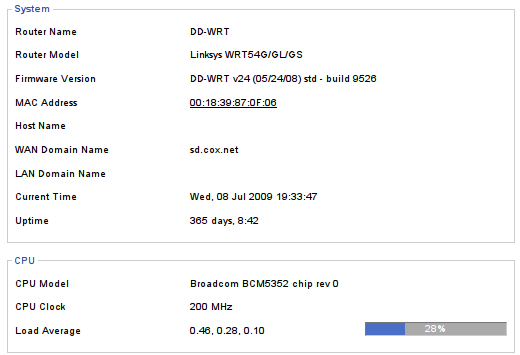
I passed 365 days of uptime on my Linksys WRT54GL v1.1 router. It’s running DD-WRT firmware, and sits on a large APC UPS. Total data transfer on the router’s WAN port is reported at 1,570,619 MB down/ 79,832 MB up.

LVM allows you to hot add devices to expand volume space. It also allows you to hot remove devices, as long as there are enough free extents in the volume group (vgdisplay) to move data around. Here I’m going to replace a 400 GB drive (sdg) with a 750 GB one (sdh) from logical volume “backup” on volume group “disks”. It does not matter how many hard drives are in the volume group, and the filesystem can stay mounted.
1 | $ sudo pvcreate /dev/sdh1 |
1 | $ sudo vgextend disks /dev/sdh1 |
1 | $ sudo pvmove -v /dev/sdg1 |
1 | $ sudo vgreduce disks /dev/sdg1 |
1 | $ sudo lvextend -l+83463 /dev/disks/backup |
1 2 | $ sudo resize2fs /dev/disks/backup $ sudo xfs_growfs /dev/disks/backup |
Scan a system for RAID arrays and save findings so the array reappears across reboots:
1 | # mdadm --detail --scan && /etc/mdadm/mdadm.conf |
Create a RAID5 array out of sdm1, sdj1, and a missing disk (all partitioned with raid-autodetect partitions)
1 | # mdadm --create /dev/md1 --level=5 --raid-devices=3 /dev/sd[mj]1 missing |
Create a RAID1 array
1 | # mdadm --create /dev/md1 --level=1 --raid-devices=2 /dev/sd[ts]1 |
Remove a RAID array
1 2 | # mdadm --stop /dev/md1 # mdadm --zero-superblock /dev/sd[ts]1 |
Replace a failed drive that has been removed from the system
1 | # mdadm /dev/md3 --add /dev/sdc1 --remove detached |
Add a new drive to an array, and remove an existing drive at the same time
1 | # mdadm /dev/md0 --add /dev/sda1 --fail /dev/sdb1 --remove /dev/sdb1 |
Add a drive to a RAID 5 array, growing the array size
1 2 | # mdadm --add /dev/md1 /dev/sdm1 # mdadm --grow /dev/md1 --raid-devices=4 |
Fixing an incorrect /dev/md number (ie /dev/md127)
1. Remove any extra parameters for the array except for UUID in /etc/mdadm/mdadm.conf. Ex.
1 2 | #ARRAY /dev/md1 level=raid1 num-devices=2 metadata=1.2 UUID=839813e7:050e5af1:e20dc941:1860a6ae ARRAY /dev/md1 UUID=839813e7:050e5af1:e20dc941:1860a6ae |
2. Then rebuild the initramfs
1 | sudo update-initramfs -u |
Quick instructions to get Folding@home (or any other program) to run at boot before user login on Ubuntu Linux. This probably works on other distros with an rc.local file too.
1. Install F@H client, mine is in /opt/folding
2. Create a simple script, I called mine folding.sh and is only has:
1 2 3 | #!/bin/bash cd /opt/folding ./fah6 -smp |
3. Put the screen command in /etc/rc.local. This will execute as user nick (su nick -c), “-dmS” will create the session detached and name it folding, and “bash –rcfile” will allow the screen session to keep running even if folding quits.
1 | su nick -c "screen -dmS folding bash --rcfile /home/nick/bin/folding.sh" |
Folding@home now starts whenever the computer boots, before anyone logs in. Nick can reattach to it and control it or watch the progress by running “screen -r folding”.